Tactics Question of the Week #4

How to beat those cowardly High Elves?

Moderators: Layne, The Dread Knights

Which approach to solving this problem is the one you prefer?

Poll ended at Mon Apr 13, 2009 7:32 am

Charge the dryads with both Dark Rider units, setting an overrun into warhawks (this requires having charged harpies away somewhere)
11
73%
Use the harpies to screen the RBT, hence getting more time to shoot the dragon (this means that DR can't combo-charge dryads)
4
27%
 
Total votes: 15

User avatar
Lakissov
Malekith's Best Friend
Posts: 1180
Joined: Tue Jun 06, 2006 12:31 pm
Location: Tallinn, Estonia
Contact:

Tactics Question of the Week #4

Post by Lakissov »

Here is the next issue of the Tactics Question of the Week!

For those who don’t know what it means: every week someone presents an interesting situation with two forces somewhere in the middle of the battle (usually, featuring not full armies but just parts thereof). The situation is usually described with a picture, and some accompanying explanations regarding the units, their rules, distances and anything else that the person presenting the situation deems necessary.

All people who read this forum are then welcome to present their “solutions” to the situation – i.e. explain what they would do in such a situation, as well as the reasoning behind certain steps. In a nutshell, this is an attempt to give substance to discussion revolving around tactics and share the common battlefield experience.

The links to previous issues of “Tactics Question of the Week” threads can be found below:
#1: http://www.druchii.net/viewtopic.php?t=60560
#2: http://www.druchii.net/viewtopic.php?t=60625
#3: http://www.druchii.net/viewtopic.php?t=60840

And now here is the question for this week. This time it’s a Druchii versus Asrai problem:
Image

This is the left flank of the battlefield. Druchii forces here are represented by a unit of dark rides with musician and without crossbows (on the left), an RBT, a unit of harpies, a unit of four remaining dark riders with crossbows and musician, and a unit of five remaining crossbow warriors with shields (five of them just died to a hail of doom arrow from the Asrai highborn).

The Asrai forced are represented by a highborn (on dragon with the 3+ ward save that works until its first failure, light armour and enchanted shield; also, the dragon has not been shot at yet – so the ward is still intact), 8 dryads, 6 remaining glade guard (the other four died during the previous Druchii shooting phase) and three war hawk riders.

There are two ridges on this flank which count as defended obstacles and give hard cover to units behind them.

So, the question is what to do. The right flank of the Druchii army doesn’t fear the attack of the dragon to its flank, because it’s covered well with a unit of black guard with attached Pendant of Khaeleth BSB for issuing challenges. The Asrai player also understands this and is going to use the dragon to hunt light units, and maybe get to the rare of the Druchii for some nice charges (and the dragon will not just hop to the center of the battlefield, because there is one more RBT on the right flank).
Last edited by Lakissov on Fri Apr 10, 2009 7:32 am, edited 1 time in total.
User avatar
Tyury
Trainee Warrior
Posts: 37
Joined: Mon Nov 03, 2008 9:09 am

Post by Tyury »

charge the left DR in the flank of the dragon to delay it.

Let the RBT and the Rxman shoot the hawkes.

the DR on the right. Let them move to the right of this picture and shoot at his glade guard and his dyrads.

let your harpies wait for the hawkes to come or for the DR on the left to die. then keep shooting while waiting for recorces from the other side of the battle field.

Or am I missing a big tactic?

chears
you can lose with a good tactic but you'll never win with a bad one.

My Brute will beat yours!
User avatar
Kinslayer
Roleplaying Deity
Roleplaying Deity
Posts: 4577
Joined: Wed Jun 04, 2008 9:50 am
Location: Roleplaying Forum

Post by Kinslayer »

The only thing with much hope of fighting that dragon and winning is the Reaper Bolt Thrower...

I'd position the left DR that the dragon could charge them and open its' flank (making it facing away from my line) and fire the Reaper at it. The other DR can finish off the GG unit with shooting after moving up, and the RXBs can fire into the drayds/GG. The harpies move into the way of the dryads (or charge them..) to stop them coming to get the RBT.
User avatar
Lakissov
Malekith's Best Friend
Posts: 1180
Joined: Tue Jun 06, 2006 12:31 pm
Location: Tallinn, Estonia
Contact:

Post by Lakissov »

Well, the idea of this field problem is that there will not be reinforcements from the other flank for neither the Druchii nor the Asrai. On the other flank, the Druchii troops are trying to reach the Asrai lines and crush them.
User avatar
Dyvim tvar
Lord of the Dragon Caves
Posts: 8372
Joined: Wed Jan 01, 2003 6:34 pm
Location: The Dragon Caves of the Underway (Indianapolis IN)
Contact:

Post by Dyvim tvar »

There is nothing you can do here to stop the dragon. Charging the Dark Riders at it will not delay it. The dragon will win and will choose not to pursue, letting the Dark Riders flee off the board. The best thing to do here is essentially let the dragon chew up the RBT (or the crossbowmen) and try to do some damage to the other stuff on this flank. Here's what I would try to do:

1) Declare charge with the harpies against the Warhawk riders -- they have a reasonable shot in the ensuing combat if the Warhawk riders stick. Also, it will clear a path for ...

2) The rightmost unit of Dark Riders charge the dryads. Then ...

3) Leftmost unit of Dark Riders charges the dryads in the flank after they have formed up on the other unit. It looks like the dark riders have enough room to get past the dragon with a wheel. Also, when the dryads align to the other unit that already charged them, it appears to bring the drayds slightly closer for the purpose of this second charge.

With 2 units of Dark Riders attacking with Hatred, and with outnumber and flank, they should handle the Dryads. Plus, if you line up that combat just right, it might be possible for one of the Dark Rider units to overrun into the harpy/warhawk combat.

4) In the shooting phase, forget about the Dragon. You aren't going to kill it, and the chance of killing the dreadlord with the RBT is only about 2.5% (single shot hits on 2+, randomizes to rider on 5+, wounds on 2+, needs to get past the 3+ ward, and then needs to roll 3 on number of wounds). Even if you can first do a wound with crossbow fire, you are still going to have to get VERY lucky and you are devoting a lot of resources for the try. Since you would probably need the Dark Riders with bows to join in, you would be sacrificing your best shot at taking out the dryads.

Instead, shoot both the crossbows and the RBT (volley fire) at the Glade Guard, which could be enough to destroy the unit completely (or at least render them mostly harmless).

Bottom line is that you have no good way to deal with the dragon, so you shouldn't try. You'll throw away your resources and lose the ability to collect victory points from the other stuff on this flank. Also, if you don't take out the other stuff, the dragon could theoretically abandon this flank to support the other one, letting the Warhawks and dryads clean up the mess. Better to keep the Dragon on this side chasing around your light elements.

Downside -- the plan depends heavily on making both fear tests for the Dark Riders to charge the dryads. Things become much more dicey if you fail either one.
Truly These are the End Times ...
User avatar
Sulla
Malekith's Best Friend
Posts: 2261
Joined: Fri Nov 08, 2002 5:56 am
Location: Flying my manticore 'Bloodmaw', looking for prey.

Post by Sulla »

Dyvim Tvar wrote:There is nothing you can do here to stop the dragon. Charging the Dark Riders at it will not delay it.


Y'reckon? 4 riders and their mounts all targetting a virtually armourless rider protected by a flimsy ward save. Even if they don't kill him, odds are they will wound a couple of times. Sure they will lose combat, but even if one survives and flees, at least that's a Ld test the dragon has to take to restrain from pursuit. The more I think about Tyury's idea, the more I like it.

Let's face it, the next best option for the dragon is a bunch of s4 and s3 shooting, most of which will hit the dragon for not much gain (one of 2 wounds off the dragon nets you nothing).

To guard against failure, you could circle the harpies around the RBT blocking a charge from the dragon but placing the closest harpy so a flee move would draw the dragon away from an 'enemy in the way' into any other DE target.

Assuming the DR didn't fail their terror test, I would be tempted to leave the DR with rxbs and the archers to wipe out the glade guard (hopefully) or if the DR failed their terror test, shoot everything at it.

With the harpies repositioned to shield the rbt from the dragons lagre base, I would still try to leave enough room to target either the glade guard or dryads (sunce they seem to be screening the easier points of the flyers).

...and next time, deploy the RBT on the hill. It's a cliche, but cliches exist because they are right most of the time.
User avatar
Dyvim tvar
Lord of the Dragon Caves
Posts: 8372
Joined: Wed Jan 01, 2003 6:34 pm
Location: The Dragon Caves of the Underway (Indianapolis IN)
Contact:

Post by Dyvim tvar »

On further consideration, here's another option that is probably even better:

1) Charge the harpies at the Glade Guard -- with negatives for shooting at skirmishers and for stand-and-shoot, the harpies should be able to make it into the combat and beat the squishy Glade Guard.

2) Charge both units of Dark Riders at the Dryads like I suggested in my post immediately above. If you beat the dryads, you can overrun/pursue into the War Hawks.

3) Shooting phase -- take a shot at the Dragon with the RBT. Probably the best result you can reasonably hope for is to put a couple wounds on the dragon, which at least makes it mroe vulnerable if it gets in range of the RBT on the other flank. Also, unless the harpies ran in panic from a stand-and-shoot reacxtion (in which case you should shoot them at the Glade Guard), try to shoot at the Dragon with your crossbows before shooting it with your RBT. If you can get lucky and do a wound to the Highborn, then his ward save is negated and the RBT has a much better shot of killing him.
Truly These are the End Times ...
User avatar
Dyvim tvar
Lord of the Dragon Caves
Posts: 8372
Joined: Wed Jan 01, 2003 6:34 pm
Location: The Dragon Caves of the Underway (Indianapolis IN)
Contact:

Post by Dyvim tvar »

Sulla --

Normally, I would think that the idea of positioning the harpies to that the harpies protect the RBT and draw away the dragon would be a great idea. However, the big downside is that this would happen in the remaining moves portion of the phase, preventing a dual charge of the Dark Riders on the Dryads.

Also, assuming that the dragon rider has a 5+ armor save in addition to the ward, the riders and the horses together will do an average of only 1.11 wounds. So they might remove the ward, which would be good, but might not do anything at all except bounce.

Note that the way I play it, the attacks of all chargers are resolved simulteneously, so the riders and horses would both be subject to the 3+ ward save. If you play it that the the riders go first because they have higher initiative, then that could give you a chance to kill the Highborn -- Riders atatck first and hopefully remove the ward save, at which point the horsies finish him off. I don't think this is the way to play it since the order of attacks in the book does not distinguish between charges with different initiative values, but I know some other play it that way. If so, then charging the dragon becomes a more viable option.
Truly These are the End Times ...
User avatar
Sulla
Malekith's Best Friend
Posts: 2261
Joined: Fri Nov 08, 2002 5:56 am
Location: Flying my manticore 'Bloodmaw', looking for prey.

Post by Sulla »

Dyvim Tvar wrote:Sulla --

Normally, I would think that the idea of positioning the harpies to that the harpies protect the RBT and draw away the dragon would be a great idea. However, the big downside is that this would happen in the remaining moves portion of the phase, preventing a dual charge of the Dark Riders on the Dryads.


Isn't this a great game when you get situations like this? I don't think I've seen a genuinely bad solution in these tactics posts, just different ideas providing more/less risks.

For your goals, your method is very sound, just I would be tempted to the more cavalier approach since it is a WE general on top of that dragon. Stuff all armour, t3 and relying totally on a ward that could dissapear after the first attack. If (and it's a big 'if') it goes 'poof!" even my horses could kill him thanks to hatred.

That slim chance is enough for me to throw caution to the wind, put mathhammer on hold for a bit and charge with a lusty piratical laugh.

Heck, if the DE general was close enough to boost the haries Ld, Id even put them in the same combat. The goal is to pop the general's ward, more than kill him.
User avatar
Master of arneim
Malekith's Personal Guard
Posts: 840
Joined: Sat Apr 03, 2004 10:46 am
Location: Testing the new jacuzZi with Morathi

Post by Master of arneim »

Interesting question, as were the others.
I do not agree with all of you above though :D, except one phrase that I'll report later.

One point per time:

- Why I'd not charge with dark riders against the dryads:
1) you have to pass two Ld checks at 8, and failing one means losing 1 unit at least.

2) You cannot overrun into the war hawks. Here it needs a little comment. Dyvim correctly said that you should be able to pick up a flank charge against the dryads: true. But it becomes impossible if the flank charge comes from the left, or better, it will be impossible to get the flank charge AND overrun into the warhawks. Note that when charging skirmishers you need to contact the nearest model: the nearest dryad from the right unit is that one that makes the point of the dryads formation, making it like a lance. If you contact this model willing to overrun into the eagles, it would be impossible to get a flank charge with the other unit of drs, and this probably would mean a minor win at maximum in the next combat phase.
Trying to charge first with the left drs would present the same problems because you could at maximum overrun into the archers (as you should turn too much to avoid a failed charge because the position of the dragon).

3) the dragon, that is the main treath, will remain with a couple of units less, having a better mobility.

- About charging the dragon: ok for the terror test, is an acceptable risk. But I still do not agree. Even considering (as I would do) that the ward save is not simultaneous (even assuming that the We player should throw one save per time, stopping when he fails), this will probably leave the hero alive (at maximum with only one wound left, but it is an optimistic count) and most of all, the dragon unscated, without any chance to shoot at it. On the other side you could try to charge with both the units, but I don't think that the right unit is able to reach the dragon (even considering another charge for the harpies and the terror test passed).
About the pursuit check, I don't think that there will be much to pursuit in the end of the combat...

- Charging with the harpies: nope. Because of this (that I find being the best solution)
sulla wrote:you could circle the harpies around the RBT blocking a charge from the dragon but placing the closest harpy so a flee move would draw the dragon away from an 'enemy in the way' into any other DE target.

That's the point in my opinion. Being able to avoid the charge of the dragon is really important and leaving the rbt alive is even better: this is your mass destruction weapon against this big target.

After cyrcling the rbt, I would bring the left drs unit within 8" from the dryads, blocking their march move, at least sacrificing them, just to gain another turn with my rbt. Note that they should avoid a charge from the hawks that would bring them near to your lines, so it is important that they move correctly, keeping their back to the left side.

With the other drs and the xbows I would turn and fire on the dragon: if I wound the noble and he loses his ward save, go with the multishot from the rbt, if not try the single bolt.

In the opponent phase, if he's smart, he'll try to bring his dragon in the middle of your units, forcing many terror tests and breathing on the ballista and the harpies, but with a bit of luck you should be still alive with the rbt (if you pass the terror test). This would mean another turn of fire.
After this, if the dragon is still alive the chances are 3 (I'm considering that he breaths on the units and do not charge the harpies):
- the dragon is seriously wounded, so he will stay in this quarter for the remainder of the game. You got half of it (160 pts), with a total loss of 474 points (all of your units on this side are dead). Not that great, but probably better than getting only the glade guards and the dryads, leaving the dragon free to move on the whole table
- the noble is dead: you get about 300 pts vs the 474... better than before, but the dragon is still alive
- no one gets hurt. You lose 474 pts gaining nothing (this should happen unlikely)

It's all a matter of dice.

If you really do not fear the dragon on the other side ok, but I'd point out that even having the pendant doesn't save your unit from being flamed, or the other units that haven't the pendant inside (it's a matter of list at this point).

I'm then assuming that this is the first druchii turn, so hurting the dragon becomes essential to the rest of the game.

If you are willing to wipe out the glade guards and the dryads, assuming your success in doing it, you will lose about 320 points (assuming tha the dragon kills the rbt and then the xbows, while the hawks wipe out one dr unit with a flank or rear charge), while gaining about 200 pts, but probably leaving the dragon with 3 full turns of freedom.

You could even adopt another tactic that could be more useful, but this totally relies on the Rulebook and on the sense of the statement on page 86 in the "hold" section: if you believe (as I do) that the dragon, when charging the rbt, should go straight ahead, being unable to turn whenever it wants, you could bring the right unit of drs (the left one cannot march) besides the rbt, with the back towards you, but able to get a frontal charge and not letting any room for contacting the rbt on the charge nor on the overrunning movement.
If you do not agree with my interpretation of the rules, so that the dragon could charge the rbt in the way he likes, so turning at the beginning of his charge movement and being able to contact a corner of the rbt (the right one), it would be better return on the harpies strategy.

What's the deal in this move? You will be free to charge with your harpies against the glade guards getting some extra points, probably surviving the breath with your knights were the harpies would have failed (because they lack of ld on the eventual panic check). Then you even gain a stand and shoot reaction with your riders, and this could prove important for erasing the ward save, or getting some extra wounds.

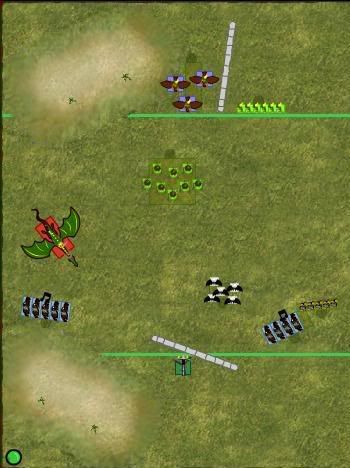
P.s: my entire post rely on the picture. This is importat for the discussion about the nearest skirmisher and the dark riders diversion on the dragon charge. If the real situation is different, my assumptions will be easily wrong.
Master of Arneim, proud ruler of the cult of the thousand draichs, because bigger is better.
User avatar
Dyvim tvar
Lord of the Dragon Caves
Posts: 8372
Joined: Wed Jan 01, 2003 6:34 pm
Location: The Dragon Caves of the Underway (Indianapolis IN)
Contact:

Post by Dyvim tvar »

Master of Arneim wrote:2) You cannot overrun into the war hawks. Here it needs a little comment. Dyvim correctly said that you should be able to pick up a flank charge against the dryads: true. But it becomes impossible if the flank charge comes from the left, or better, it will be impossible to get the flank charge AND overrun into the warhawks.


I could certainly be wrong, but it looks to me like the unit of Dark Riders on the right could charge the dryads by moving straight forward, and just before making contact with the rightmost dryad (which looks like the closest one), it could execute a tactical wheel to the left. That should rotate the battle line in such a way that the second unit of Dark Riders on the left (which is the larger one and which would therefore dictate the path of pursuit assuming it is still larger after combat) would both hit the flank of the dryads and would have a continuation path that would hit the warhawks.

Also, as far as the dragon charging the RBT and its line of attack, the rules for flyers dictate that the dragon could rotate freely at the start of its move, but that the path must be straight after that. So if it makes any difference, I think the Dragon can aim for the corner of the RBT rather than the dead center. Also, if close enough to use its ground movement, it could do a tactical wheel (tactical pivot in this case) when charging against the machine.

That being said, I agree that this is a complicated situation and there is more than one way to deal with it. I do see merit to the idea of encircling the RBT to protect it from the dragon, and I agree that march-blocking the dryads with one of the Dark Rider units is key if that's what you are going to do with the harpies. The dryads are a significant threat and you want to slow them down in this case. Also, if you decided to do things this way, I would not focus all of my shooting on the dragon, but would probably unload my crossbowmen on the glade guard in an attempt to neutralize them. Since you are buying time with the harpies for the RBT to shoot at the dragon, you don't necessarily need to risk everything on taking the Highlord down with shooting this turn.
Truly These are the End Times ...
User avatar
Lakissov
Malekith's Best Friend
Posts: 1180
Joined: Tue Jun 06, 2006 12:31 pm
Location: Tallinn, Estonia
Contact:

Post by Lakissov »

Hm, very interesting ideas. One comment on the diagram: although in the actual battle which was played, the units were positioned slightly differently (i.e. the diagram is not 100% accurate), I suppose that it is better just to leave the situation like it is drawn at the moment.

Let's assume that the closest dryad to the righ-most unit of Dark Riders is the right-most dryad. Hence, it is actually possible to make a tactical wheel allowing the left unit of riders to pursue into the warhawks.

In the evening, I'll supply also some calculations for some of the most critical combats featuring in different solutions.
User avatar
22over7
Dark Rider
Posts: 128
Joined: Fri Nov 28, 2008 10:34 am
Location: Near enough

Post by 22over7 »

Assessment:
The biggest threat and biggest prize is the Dragon.
There are few viable targets for effective shooting due to skirmishing/high T or AS (GG excepted).
Dryads are not yet a problem, but will decimate anything the dragon leaves on this flank.
I can't risk charging the War Hawks as any pursuit by them will give them a charge next turn.

I'm not entirely sure what "hit and run" from the warhawks does but will assume it has no impact as noone else has mentioned it.

Harpies: Fly in front of the Dryads (about 5" away) and march block them, hidden from the warhawks.

Right RCBs & DRs: Shoot the GG, 18 shots on 5s should wound, kill 3, largely neutralising this unit (easy VPs).

Left DRs: Move to screen the RBT from a Dragon charge, they will be able to hold (I believe if they fail a fear test from a charging dragon they will need 6s rather than being forced to flee as they outnumber?).

RBT: Shoot on multi shot 'til the Ward Save fails.
When a young Malekith failed to complete his maths homework, Morathi was overheard saying to his friends "He's not the future Pheonix King, he's a very naughty boy".

DE 7ed W6/D3/L6
User avatar
Master of arneim
Malekith's Personal Guard
Posts: 840
Joined: Sat Apr 03, 2004 10:46 am
Location: Testing the new jacuzZi with Morathi

Post by Master of arneim »

Dyvim Tvar wrote:I could certainly be wrong, but it looks to me like the unit of Dark Riders on the right could charge the dryads by moving straight forward, and just before making contact with the rightmost dryad (which looks like the closest one), it could execute a tactical wheel to the left. That should rotate the battle line in such a way that the second unit of Dark Riders on the left (which is the larger one and which would therefore dictate the path of pursuit assuming it is still larger after combat) would both hit the flank of the dryads and would have a continuation path that would hit the warhawks.


I'm not sure of this, as if you try to execute the tactical wheel to the left you should contact the righter dryad before the closest one. Of course, if the situation is
Lassikov wrote:Let's assume that the closest dryad to the righ-most unit of Dark Riders is the right-most dryad. Hence, it is actually possible to make a tactical wheel allowing the left unit of riders to pursue into the warhawks.

I finish my arguments :D

About the dragon: I understand what you're talking about, but in my opinion even this starting turning is forbidden by the RB as you should "line up (the crew) perpendicular to the direction of the charge". Some times ago in the rule section there was such a discussion and while I was presenting this opinion, others (I think it was Dalamar most of all) presented another view, assuming that you could always choose to pivot with a tactical conversion to just "decide" where to overrun. It's a matter of interpretations I think, or maybe I'm simply wrong. If I'm wrong, it becomes impossible to screen the rbt with the riders.

Still charging the dryads is risky (most of all because 2 ld check), but could earn back many and many points if all goes well. If not you will probably lose everything in 2 turns without significant damage. One key problem are the harpies: you cannot screen the rbt while charging with both the drs and this really makes things even harder. I would prefer to protect the rbt instead of killing the archers, slowing down the dryads.

@22over7: I don't think that you could move your righter drs to be able to cover the ballista. In my opinion 9" are not enough (you cannot march).

On the other side, shooting vs the archers with the xbows could be a good idea, but I would surely try to pull off that damned ward save at all costs, maybe even getting a wound on the dragon...
Master of Arneim, proud ruler of the cult of the thousand draichs, because bigger is better.
User avatar
Ehakir
Malekith's Best Friend
Posts: 1138
Joined: Fri Dec 15, 2006 7:45 am
Location: Located

Post by Ehakir »

What I would do:
Well, it is a bit a screwed up situation, as you do not have the ideal troops at the flank to kill the dragon. The elf on top allows an easy removal of his 3+ ward save however, and assuming that you will roll the dice in batches, or, roll wardsaves one by one, until you fail your first, I would charge in the Dark Riders on the left in the flank of the Dragon and charge in the harpies in the front. It might be a rist at ld 8 & 6, but if you do so, at least one unit will probably get there and make the wardsave disappear. Probably :P. The crossbowmen and bolt thrower will shoot the glade guard. First the crossbowmen, then the bolt thrower. If the crossbowmen manage to kill them in their volley the bolt thrower will shoot the warhawk riders however, as the dark riders can be used to lure the dryads, not the warhawks as those are too fast.
Then, in the next round, the Dragon is dead or gets to choose between the bolt thrower and the crossbowmen. They will flee, allowing the other unit to shoot at the dragon, hoping on inflicting another wound, or even kill the rider. If you manage to kill the rider of the dragon, kill the glade guard and minimalize the warhawk riders, you have already done a great job.
"Ceterum censeo Ulthuan esse delendam"
-Ehakir

3/4 of games are won by deathstars. Copy this into your signature if you still use real tactics to win.
User avatar
Grez90
The Tamer of Sea Dragons
Posts: 403
Joined: Sat Jul 19, 2008 10:06 pm

Post by Grez90 »

Assuming that it is not the last turn, and that the dark riders had already taken a terror test from the dragon, heres what I would do.

Working from left to right,
Unit of 5 dark riders I would strafe about 4" to the right, this would then mean I get a clear charge on the dryads next turn instead of charging at an angle ( as it looks like i may pursue into the defended obstacle and not into either of the wood elf units.
plus if I wasn't facing the most experienced player, he could possibly declare a charge on the dark riders with the dragon, beat them in combat and pursue off of the table leaving my bolt thrower to have an extra round of shooting.
I would charge the harpies into the galde guard due to a -3 penalty for skirmished, long range and stand and shoot reaction and still only str3.

I would then take a pot shot at the dragon and hope for the best, as I cannot see the warhawk riders, and the dryads are skirmished with a 5+ ward.
The rest of the army would shoot at the warhawk riders to cause a panic test.

His next turn would mean charging either dark riders or rbt with dragon, whichever he does not choose will attack the dryads (either double dark rider charge with highest us hopefully pursueing into warhawk riders, or rbt and rxb fire at dryads and warhawk riders).
User avatar
Lakissov
Malekith's Best Friend
Posts: 1180
Joined: Tue Jun 06, 2006 12:31 pm
Location: Tallinn, Estonia
Contact:

Post by Lakissov »

Ah, one thing that I forgot to mention is that this is the situation after the 1st turn of Asrai (Druchii went first).

As for the calculations,here are stats for three situations:

1. two DR units against dryads (8 DR models in contact with 7 dryads models). Given that DR most likely have +2 SCR (outnumber and flank) and musician, the odds of outcomes are:
DR lose: 8.7%
DR win by 1: 17.4%
DR win by 2: 12.8%
DR win by 3: 14.1%
DR win by 4: 13.7%
DR win by 5: 11.8%
DR win by 6+: 21.5%
So, in sum, if both DR units get the charge on dryads, they have a very good shot at breaking them.

If only one DR unit charges the dryads (assuming 4 DR models and 6 dryad models in contact), then the chance that DR generate less or equal ACR than dryads is 71% (meaning that the chance that DR are defeated by outnumbering fear causers is 70.7% - because the chance that there were no casualties at all is 0.3%, and if dryads and DR inflicted equal amount of casualties, then DR are outnumbered). So, if only one DR units manages to charge, then its chances are very bad.

Finally, odds for the combat of harpies against GG:
harpies lose: 40.7% (because GG outnumber)
draw: 18.9% (GG have no musician)
harpies win by 1: 16.8%
harpies win by 2: 12.1%
harpies win by 3+: 11.5%

So, it might not be a good idea to charge the harpies into GG.

If that changes the way someone would act, please share your insight with the rest of us.
User avatar
One-s
Beastmaster
Posts: 364
Joined: Thu Apr 19, 2007 7:54 pm
Location: Genk - Belgium

Post by One-s »

Nice topic, I'll jump right into it.

I read a lot of interesting options and I'd like to add one more.

Use the harpies to screen the boltthrower.
They're skirmishers, so you could position them in such a way that the closest visible harpie (for the dragon) is the one on your left.
Make shure that there's no place for the dragon to position itself in contact with the reaper.
If there's no place for the dragon to land, then he'll have to charge the harpies before he can get to the reaper.
If he chooses to charge the harpies, then you just flee with them.
The dragon then pursues the harpie on the left, leading it away from the reaper and anything else that could be interesting (hard to say from the image, but the dragon could even pursue of the table).

So IMO the harpies should screen the reaper.
The darkriders should combo charge the dryads (as mentioned above)
Shoot at the glade guard with the crossbowmen, if that doesn't kill them, then use the reaper to finish them off.

The warhawks can become a problem if the darkriders don't break the dryads, but if they do, consider the warhawks taken care of.
User avatar
Azure
Rumour Lord of Doom
Posts: 3483
Joined: Sat Nov 22, 2003 5:11 pm
Location: Har Ganeth (Santa Cruz, CA
Contact:

Post by Azure »

First off let me say that its been a busy couple of weeks in between school and work for me and I appreciate Lak for taking over. I should be back to a semi normal schedule soon.

As for the tactics question. I would charge the harpies into the warhawks (banking on the off chance that they can defeat or hold them) right Dark Riders into the dryads and then the left unit of Dark Riders into the dryads. RXB warriors will shoot at the GG and depending on the casualties inflicted the bolt thrower will either take some pot shots at the Dragon OR the Glade Guard. Most likely the dragon though. Gotta start denting it some time.

-Rex
Moderator - Druchii Tactics
Belial. wrote:OT [forum] is quite quiet most of the time, except when Azure makes a new topic.

Free Porn!
Become my padawan! This game is fun! http://azuredruchii.mybrute.com
User avatar
Lakissov
Malekith's Best Friend
Posts: 1180
Joined: Tue Jun 06, 2006 12:31 pm
Location: Tallinn, Estonia
Contact:

Post by Lakissov »

My plan would be:
1. Block the RBT with harpies from the incoming dragon charge (this is what I actually did in the game initially)
2. Make no moves with the right DR or crossbowmen - they both should instead shoot at the glade guard. Crossbows shoot first, and if they reduce GG to 1-2 models, then RxB shoot at the dragon instead, hoping to neutralize the ward on the highborn, and hence helping the rbt to kill the highborn using multishoot option over two rounds of shooting.
3. The left DR should move out of LOS of the dragon, but into a position where they would be able to charge the dryads, should they come closer to the RBT; what's important is that the second DR would also be able to charge them in that position.

This way, the druchii will have a good shot at killing the highborn (with two turns of shooting) and the dryads and the GG. Additionally, the dragon would most likely be delayed greatly. Most likely, the warhawks would be able to kill the RBT, and the dragon would kill the harpies, but the rest of Druchii units on this flank would not suffer (unless the dragon decides to stay on this flank).

Oh, by the way, let's spice the question up a bit by adding extra conditions:
Now, additionally to the previous conditions, we have a COB on the right flank, the area of blessing of which reaches approximately till the left-most harpy, and which might be used for bestowing blessings, if the effect is really useful (otherwise, it would make more sense just to bestow a 5+ ward on the hydra on the far right flank).

Any changes to the plans in this case? Any additional thoughts and comments?
User avatar
22over7
Dark Rider
Posts: 128
Joined: Fri Nov 28, 2008 10:34 am
Location: Near enough

Post by 22over7 »

Lakissov wrote:My plan would be:
1. Block the RBT with harpies from the incoming dragon charge (this is what I actually did in the game initially)


My worry with this is that the harpies (being outnumbered) will flee a charge on 2D6 = 7+ and the dragon can just overrun into the RBT. Or have I missed something.

That's why I tried and failed (as MoA pointed out I messed up my distances) to use the DRs as a shield instead. Everything else you say though makes perfect sense.

Cauldron
Interesting...Main advantage is giving +1A to the DRs, main problem is that this would require passing a fear check first (the result of which is not know until after the blessing is bestowed). However given your probabilities above an extra 4 hatred Str4 attacks on the dryads would not add much to the result... Bless the Hydra. :(
When a young Malekith failed to complete his maths homework, Morathi was overheard saying to his friends "He's not the future Pheonix King, he's a very naughty boy".

DE 7ed W6/D3/L6
User avatar
Dyvim tvar
Lord of the Dragon Caves
Posts: 8372
Joined: Wed Jan 01, 2003 6:34 pm
Location: The Dragon Caves of the Underway (Indianapolis IN)
Contact:

Post by Dyvim tvar »

22over7 wrote:My worry with this is that the harpies (being outnumbered) will flee a charge on 2D6 = 7+ and the dragon can just overrun into the RBT. Or have I missed something.


The plan is to flee with the harpies anyway. But the dragon needs to follow them when they flee, and you can position them such that their direction of fleeing will make it impossible for the dragon to declare and Enemy in the Way charge on the RBT.
Truly These are the End Times ...
User avatar
Lakissov
Malekith's Best Friend
Posts: 1180
Joined: Tue Jun 06, 2006 12:31 pm
Location: Tallinn, Estonia
Contact:

Post by Lakissov »

@22over7
the idea with blocking is to put the harpies in such a position that the dragon can't land in base contact with the crew, but the closest visible harpy would be to the left of the RBT - hence making the flee move go pretty much south-south-west, and taking the dragon there as well (into a position where he stays on the table, but can't see anyone, facing the lower end of the table).
User avatar
22over7
Dark Rider
Posts: 128
Joined: Fri Nov 28, 2008 10:34 am
Location: Near enough

Post by 22over7 »

Thanks guys :oops:

I am now poised for further embarrassment later this week when you reveal the optimal CoB blessing to give on this flank. :)
When a young Malekith failed to complete his maths homework, Morathi was overheard saying to his friends "He's not the future Pheonix King, he's a very naughty boy".

DE 7ed W6/D3/L6
User avatar
Darkangel16
Black Guard
Posts: 279
Joined: Thu Mar 05, 2009 4:58 am
Location: in your hearts and minds

Post by Darkangel16 »

i'd forget the blessings for this flank, as you need to make sure your heavy hitters reach the enemy center.

dyvim's strategy makes the most sense to me. attempting to kill the dragon is chancy, whereas charging both units of DR's into the dryads and then the war hawks is a safer option, with a great chance of reward.

also, once you break through the Asrai's flank, you'll have dark riders and maybe some harpies in their optimal position, the enemies flank. There you can either use them combo charge the enemy's center, or aid your own heavy hitters in taking down the dragon with combo charges.
Post Reply