All right, time to analyze this a bit
First, a short analysis of the army lists
Dreadlord
Very fragile, but is capable of dealing with the Treeman single-handedly; in the ideal case, I’d like him to get into combat with the Treeman, but it’s not guaranteed. Against other characters, he would also be good. He is definitely able to boost any unit.
Sorceresses & Magic
First, let’s cover magic defense. We generate 4 DD and have 2DS against the enemy’s 3PD (of which only two can be used per turn by the L1 sorceress) and 1 bound tree singing. This most likely means that we don’t have to fear the magic too much. In those turns where we have some of our fragile characters on solo-missions in the woods, we have something to fear – but for those turns we can use 2DD for dispelling the bound tree-singing, and a scroll to dispel the spell (if it is cast at all). So that’s covered.
Now, about magic offense:
We generate 6 PD + bound Steed of Shadows against the enemy’s 3DD and 2DS (I assume that the L1 spell singer is a scroll caddy); we have 5 spells among two sorceresses. This means that magic can become a good asset for us.
When deciding upon the lore for each sorceress, we should consider several things:
- The opponent has many ItP units
- The opponent has a lot of MR
- All our characters are on foot; besides, our lord, although mighty, doesn’t have a delivery mechanism to get to the things he’d like to kill
- The opponent is very mobile, and most of his units are weaker than our units in CC
You see where I’m hinting? It might be a very good idea to take the lore of shadows at least on one of the sorceresses – maybe even both.
Yes, some of the spells are crap, but we don’t have too many PD anyway, so we won’t be able to cast many spells anyway. If each sorceress has one useful spell, that is enough. And with two killer-characters on foot (the Dreadlord and the Assassin), steed of shadows becomes a very unpleasant spell for the opponent.
Just imagine – first turn, we could cast Steed of Shadows three times on the Dreadlord (the bound, and the two castings on three PD each). The opponent either has to let us teleport the dreadlord to a character/unit that we want dead this turn, or use up all the magic defense (yes, both scrolls would be needed to stop this) – and then we can try again next turn, this time unstoppable.
And we might even get lucky, and roll the Unseen Lurker with one of the sorceresses…
So, I strongly recommend taking the Lore of Shadow with both sorceresses
Infantry blocks
We have three infantry blocks that the opponent can’t hope to take head on: the BG, the witches and the warriors. This means that the opponent will have to try to outmanoeuvre them with fast cavalry – and even this will only be a problem for warriors and witches; BG will just slaughter anything that gets in tough with them, so the enemy will try to shoot them instead.
Movement Control
For movement control, we have 2 units of harpies, two units of DR, and 15 crossbow elves. With this, we should be able to eliminate enemy fast units quickly. However, I’d actually suggest to focus more shooting on glade guard – because they are the main unit that is able to make both our fast units and our infantry useless (they do shoot quite well).
Additionally, I expect that some of our light units are going to be in great danger from the alter noble and highborn. They are very good at taking out such units. This means – keep harpies away from the threat range of these monstrosities.
Combat
Here we have clear superiority. The only enemy units that are able to be good in CC are dryads, wardancers and treeman. However, each of our own combat units on its own is better than each of theirs. So, we are ok with going solo into combat against them, but they are not OK with going solo into combat against our units. They will have to combo-charge, and we don’t have to. Hence, our task is to prevent combo-charging.
---
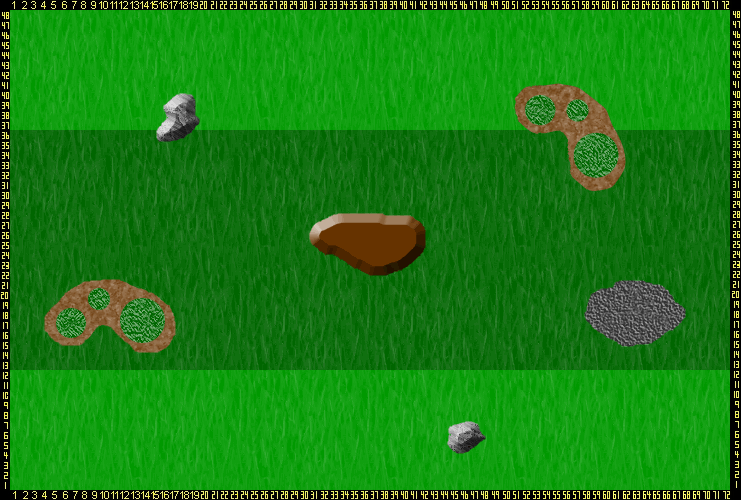
Now, some words about the terrain
The left flank of the battlefield hosts a wood – an important strategic asset for the enemy.
The center hosts a hill – very good for protection from shooting and for getting up close and personal (the one who gets close to the hill, but not on top, will prevent the enemy from getting on top of the hill, as he will be threatening to make a charge; however, our combat units don’t fear to get charge by woodies, and so this is more of an asset for us).
The right flank has a piece of difficult terrain, which is an excellent place to put archers behind – making any potential chargers go through or around difficult terrain; the wood elves will most likely put a unit of archers here, which will make this flank dangerous for our fast units to be.
Based on this, I’d suspect that the enemy will put many manoeuvrable elements on the right flank, along with the archers.
The wardancers will most likely hide in the wood on the left, together with the scroll caddy. The dryads can then occupy the center.
What’s important to understand during deployment is that a big part of the strength of our list lies in our ranked infantry, and so we can’t afford to put it on any of the far flanks (because whatever we guess, the enemy might be on the other flank – and then our infantry is wasted). So, I’d put all of our infantry in the middle, from which they could go to any of the sides. I’d have a slight bias towards the left flank, though, as I believe that the most stuff to kill will be there.
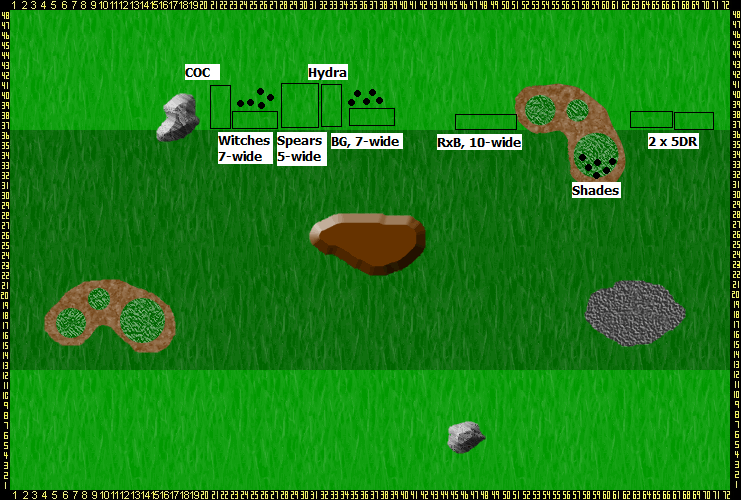
I’d load the right flank with shooting elements, to prevent the light units of the enemy deployed there from feeling too comfortable. I’d put the crossbows there, 10-wide, touching the wood, and both dark rider units, touching it from the other side (it can’t move left or right). I’d put the shades inside the wood, and move them out in the very first turn, to shoot and to not even have the slightest risk of tree singing damaging them. This way, I’d have 52 shots on this flank.
As for the main force in the centre-left, I’d anchor the very left flank of this force with my COC, to prevent from being outflanked by any light units. Then, I’d put my witches and warriors nearby. The dreadlord and the assassin would go into the warriors unit – they can redeploy later, if needed. The hydra and the BG would go into the very centre of the battlefield, with BG covering its right flank, and the hydra being able to get to left, right or centre – wherever there is more stuff to eat. The harpies would stay hidden behind my infantry units – I might need them later to block incoming charges. Also, from the places where they are,t hey are both able to hop to behind the hill, protected from potential charges and whatever else – and from there, they can go pretty much anywhere.
Lastly, the sorceresses should both go into BG (to its left corner) – this is a very good ItP bodyguard unit, and it is close enough to the targets of Stead of Shadows and Unseen Lurker. Besides, later I might redeploy them, if I felt like it.
So, the deployment would be like this, if I were to decide: